
Related Posts


Podcasts


Is it better to install the HubSpot tracking code directly on your website, or should you implement it via Google Tag Manager? You know tracking code is important, but does either method offer any differences that matter to your business? Understanding the differences between direct installation and using Google Tag Manager (GTM) is crucial for effective tracking and data management.
Directly installing the HubSpot tracking code is straightforward and quick, making it an attractive option for smaller websites or those with fewer tracking needs.
However, managing multiple tags and frequent updates can become cumbersome as your tracking requirements grow. This is where Google Tag Manager comes in.
GTM provides a centralised platform to manage all your tracking codes, offering greater flexibility and efficiency, especially for larger or more complex websites.
In this article, you will learn the pros and cons of each method, how to implement them, and which one might be the best fit for your needs. By the end, you’ll have a clear understanding of how to optimise your tracking setup for better data insights and campaign performance.
Overview of HubSpot Tracking Code
The HubSpot tracking code is a snippet of JavaScript that you add to your website to enable HubSpot to track visitor interactions and gather data for analytics.
This tracking code is essential for leveraging HubSpot’s suite of marketing tools, including analytics, lead tracking, and automation. The data collected through the tracking code helps you understand user behaviour, optimise your marketing efforts, and ultimately improve conversion rates.
Key Features of HubSpot Tracking Code
- Visitor Tracking: Tracks visits to your website and collects data on visitor behaviour, such as pages viewed, time spent on site, and conversion actions
- Lead Tracking: Monitors interactions with your website and captures lead information, helping you to nurture and convert leads more effectively
- Event Tracking: Allows you to track specific events on your website, such as form submissions, button clicks, and downloads
- Analytics Integration: Provides detailed analytics reports within HubSpot, enabling you to measure the performance of your marketing campaigns and make data-driven decisions
How the HubSpot Tracking Code Works
- Data Collection: When a visitor lands on your website, the tracking code collects data about their visit and interactions. This data is then sent to HubSpot’s servers for processing
- Cookie Usage: The tracking code uses cookies to identify and track visitors over multiple sessions. This helps in understanding returning visitor behaviour and personalising their experience
- Integration with HubSpot Tools: The data collected by the tracking code integrates seamlessly with HubSpot’s marketing, sales, and service tools. This enables comprehensive tracking and reporting across all your customer touchpoints
The HubSpot tracking code is a powerful tool that provides valuable insights into your website’s performance and your audience’s behaviour.
However, the method of installing this tracking code can impact its effectiveness and ease of management.
Step by Step Guide: Installing HubSpot Tracking Code Directly
Installing the HubSpot tracking code directly on your website is a straightforward process that involves adding a snippet of JavaScript code to your website’s HTML.
This method is ideal for smaller websites or those with simpler tracking needs. Here’s a step-by-step guide to help you install the HubSpot tracking code directly.
And below is a summarised dot point list we created based on HubSpot’s official guide:
And below is a summarised dot point list we created based on HubSpot’s official guide:
Get the Tracking Code:
- Log in to your HubSpot account
- Navigate to your account settings by clicking on your profile picture in the top right corner and selecting “Account Settings”

- In the left sidebar menu, go to “Tracking & Analytics” and then click on “Tracking Code”

- Copy the provided JavaScript code

Access Your Website’s HTML:
- Open the HTML source code of your website. You’ll typically do this through your content management system (CMS) or by directly editing the HTML files on your server

Paste the Code:
- Insert the tracking code into the HTML of your website, just before the closing </body> tag on each page you want to track
- If your website uses a template or a shared footer file, you can add the code there to ensure it appears on every page
- Make sure you add this to each page on your website. Usually, if you’re using a CMS you’ll be able to add it to one section which will automatically add it to all pages, however, this depends on the CMS and web build you’re using
Publish Changes:
- Save and publish the changes to your website. Ensure that the new HTML is properly uploaded and applied to all relevant pages
Pros & Cons of Installing HubSpot Code Directly on Your Website
Pros:
- Simplicity: Direct installation is straightforward and doesn’t require additional tools. It’s a quick way to get started with HubSpot tracking
- Immediate Effect: Changes take effect immediately, as there’s no intermediary tool to process the tags
Cons:
- Manual Updates: Any changes to the tracking code must be manually updated on each page. This can be time-consuming, especially for larger websites with many pages
- Limited Management: Direct installation doesn’t provide a centralised way to manage all tracking codes. If you’re using multiple analytics or tracking tools, it can become cumbersome to manage
Direct installation is a good starting point for smaller websites or those with simple tracking needs.
However, managing multiple tags and updates manually can become inefficient as your tracking requirements grow. This is where a tag management system like Google Tag Manager can be beneficial.
Using Google Tag Manager for HubSpot Tracking
Google Tag Manager (GTM) is a powerful tool that allows you to manage all your website tags, including the HubSpot tracking code, from a single interface.
This method provides greater flexibility and efficiency, especially for larger websites or those with complex tracking needs.
Here’s a step-by-step guide to help you set up the HubSpot tracking code using GTM:
Steps to Install HubSpot Tracking Code via Google Tag Manager
Set Up Google Tag Manager:
- If you haven’t already, create a GTM account at Google Tag Manager

- Set up a new container for your website. This container will hold all your tags

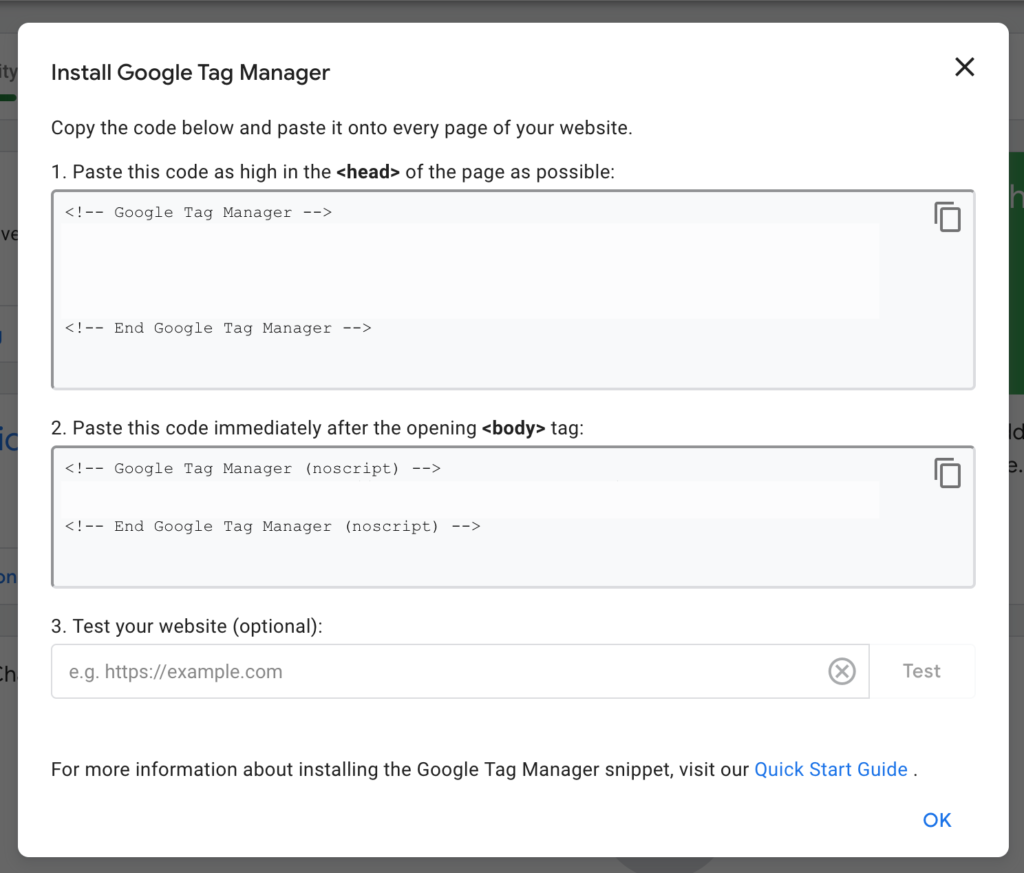
Add GTM to Your Website:
- Follow the instructions provided by GTM to add the container code to your website. This typically involves placing one part of the code in the <head> section and another part after the opening <body> tag of your website’s HTML
Create a New Tag:
- In your GTM account, click on “Add a new tag.”

- Name your tag (e.g., “HubSpot Tracking Code”)

- Choose “Custom HTML” as the tag type

- Paste the HubSpot tracking code (which you obtained from your HubSpot account) into the HTML field

Set Triggers:
- Set the trigger to fire on all pages. This ensures that the HubSpot tracking code is executed on every page of your website

- To do this, click on “Triggering” and select the “All Pages” trigger

Publish the Container:
- Save your new tag

- Click on “Submit” to publish the container changes. This will push the HubSpot tracking code live on your website
Pros & Cons of Installing HubSpot Code Through GTM
Pros:
- Centralised Management: GTM allows you to manage all your tracking codes from a single platform. This is particularly useful if you use multiple tracking and analytics tools
- Ease of Updates: Adding, editing, and removing tags can be done within GTM without altering your website’s code. This saves time and reduces the risk of errors
- Advanced Features: GTM offers advanced features like tag sequencing and custom triggers, allowing for more complex and efficient tracking setups
Cons:
- Initial Complexity: Setting up GTM can be more complex initially compared to direct installation. However, once set up, it simplifies ongoing management
- Learning Curve: There is a learning curve associated with using GTM, especially if you are unfamiliar with tag management systems. Understanding how to create tags, triggers, and variables can take some time
Using Google Tag Manager for HubSpot tracking provides a scalable and flexible solution, making it easier to manage multiple tags and complex setups. This method is particularly beneficial for larger websites or those with dynamic tracking requirements.
When to Use Each Method
You should opt for direct installation when any of this applies:
- Ideal for smaller websites with fewer tracking needs and less frequent updates
- Suitable if you don’t plan to frequently add or modify tracking codes
- Beneficial if you prefer a straightforward setup without using additional tools
You should opt for Google Tag Manager implementation when any of this applies:
- Better for larger websites or those with complex tracking requirements
- Useful if you’re using multiple tracking and marketing tools and want a centralised management system
- Preferred if you want a scalable and flexible solution that can adapt to evolving tracking needs
So, What’s Next?
Choosing between direct installation and using Google Tag Manager for your HubSpot tracking code depends on your specific needs and resources.
Direct installation is simple and quick for smaller websites with fewer changes, while Google Tag Manager offers a more scalable and efficient solution for managing multiple tags and complex setups.
By understanding the pros and cons of each method, you can make an informed decision that best suits your business needs and helps you optimise your tracking and analytics efforts.
If you’re using HubSpot, it’s important to take advantage of the most important features that HubSpot has to offer. Check out our article on the best HubSpot features below.
Read: 5 Best HubSpot Features